In a digital world, maintaining control over your personal information is important. There may come a time when you need to update or remove your phone number from your Facebook account. Whether it's due to a number change or increased privacy, BMface will guide you through the process of removing your phone number from Facebook, including solutions to common problems encountered during the deletion process.
Steps to Remove Your Phone Number from Facebook
Removing your phone number from Facebook can be a straightforward process if you decide you no longer want it associated with your account. Whether it's for privacy concerns or simply a change in preference, here’s how you can remove your phone number:
Accessing Your Account Settings
Step 1: Log into Facebook
- Navigate to Facebook on a web browser and log into your account.
- Click on the downward arrow located in the top right corner of the homepage.
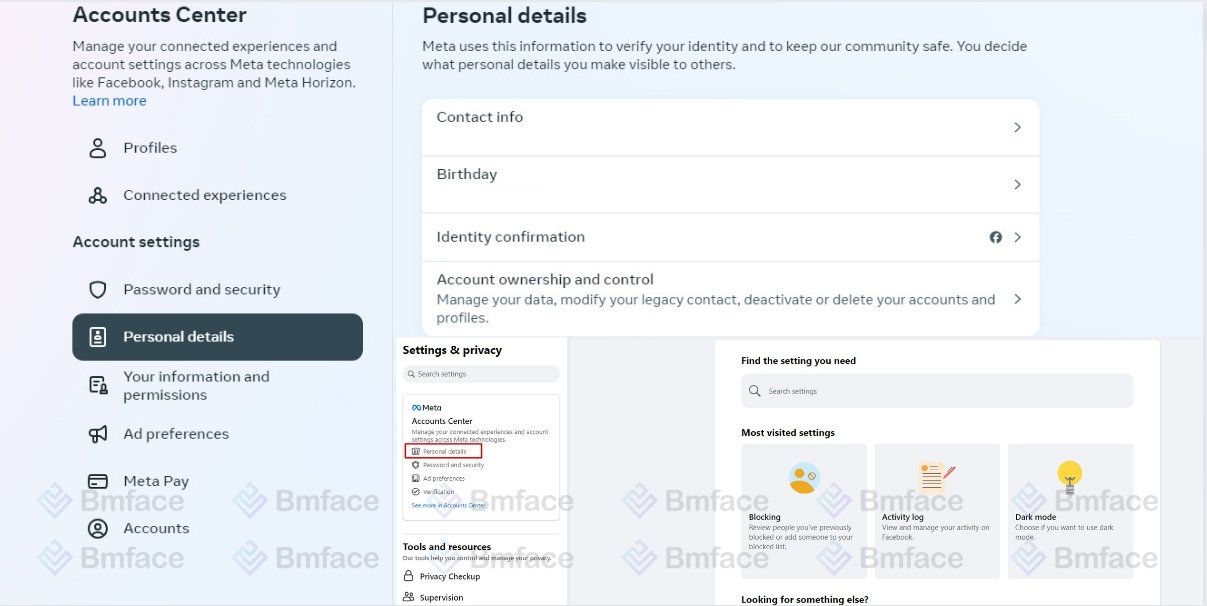
- Select Settings & Privacy and then click on Settings.
Navigating to Personal Information
Step 2: Access Mobile Settings
- On the left sidebar of the Settings menu, click on Mobile.
- This page will display all the phone numbers currently associated with your Facebook account.
Removing Your Phone Number
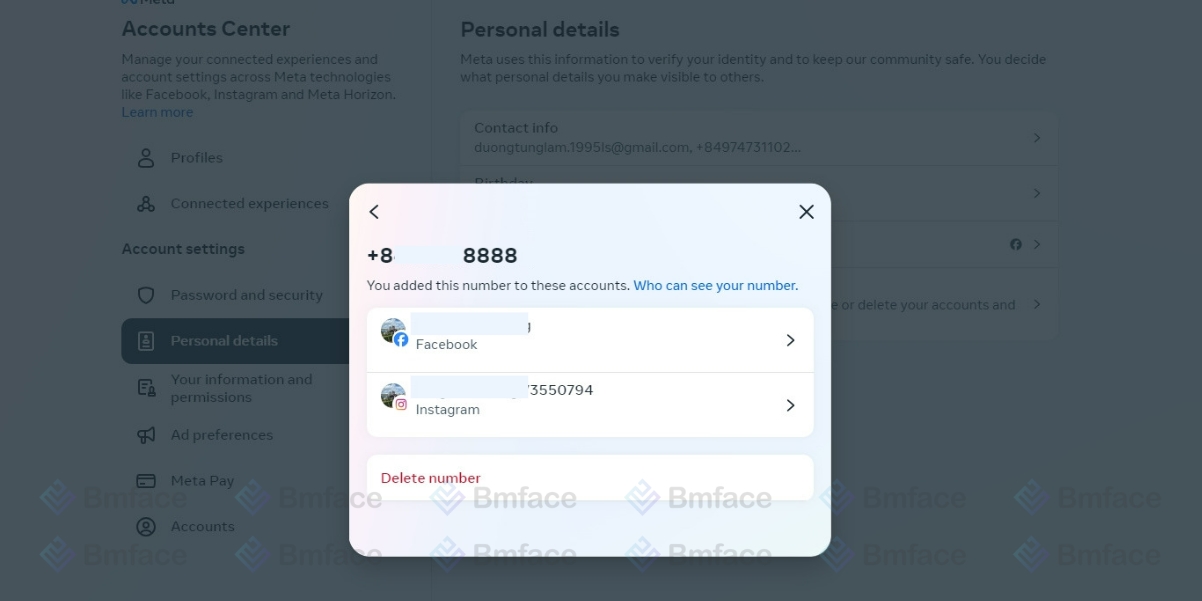
Step 3: Remove Phone Number
- Find the phone number you wish to remove. Next to it, there will be an option to Remove.
- Click Remove. Facebook may ask you to confirm your password to proceed.
- After entering your password (if prompted), confirm your decision to remove the phone number from your account.
Additional Considerations
-
Review Two-Factor Authentication (2FA): If you have two-factor authentication enabled using your phone number, you may need to adjust your 2FA settings before removing your phone number. Consider switching to an authentication app for 2FA to maintain account security.
-
Update Recovery Options: Ensure you have an alternative recovery method set up, such as a secondary email address, to avoid issues with account access in the future.
-
Confirm Removal: After removing your phone number, navigate back to your settings to ensure the number has been successfully deleted from your account.
Removing your phone number from Facebook is a simple process that can help you manage your privacy and personal information on the platform. Just remember to consider the implications for account security and recovery options before making the change. Regularly reviewing and updating your privacy and security settings is a good practice to ensure your Facebook experience aligns with your personal preferences and security requirements.
Updating Your Contact Information
Updating your contact information on Facebook, particularly when changing your phone number, is crucial to keep your account secure and ensure you can easily recover access if needed. Here's how you can update your contact information by first removing your old phone number and then adding a new one:
1, Removing Your Old Phone Number
-
Log into Facebook: Access your Facebook account by logging in on the web browser.
-
Access Settings: Click on the downward arrow in the top right corner of the homepage and select Settings & Privacy > Settings.
-
Go to Mobile Settings: In the left sidebar, click on Mobile to view the phone numbers associated with your account.
-
Remove Old Number: Find the old phone number you wish to remove and click the Remove option next to it. You may be asked to confirm your password to proceed. Follow the prompts to confirm the removal.
2, Adding Your New Phone Number
-
Add a Phone Number: In the Mobile Settings menu, after removing the old number, click on Add a Phone Number.
-
Enter Your New Number: Follow the prompts to enter your new phone number. Ensure it's correctly entered to avoid issues with verification.
-
Verify the Number: Facebook will send a verification code via SMS to the new number. Enter this code on the Facebook verification prompt to confirm that the phone number is yours.
-
Set Preferences: After verification, you can set your preferences for who can find you using your phone number and whether you want to receive notifications on this number.
3, Considerations for Updating Your Contact Information
-
Review Security Settings: With your new phone number added, consider revisiting your security settings. If you use Two-Factor Authentication (2FA), ensure it's set up with your new number.
-
Update Recovery Options: Make sure your account has other recovery options, like an email address, so you have multiple ways to recover your account if needed.
-
Privacy Settings: Decide if and how your phone number is shared on Facebook. You can adjust who can look you up using your phone number or whether it's visible on your profile.
Keeping your contact information up to date on Facebook is essential for maintaining the security and accessibility of your account. By removing outdated information and adding your new phone number, you enhance your account's security and ensure you remain reachable for important notifications or account recovery purposes. Regularly reviewing and adjusting your account settings, including privacy and security preferences, can further protect your information and improve your Facebook experience.
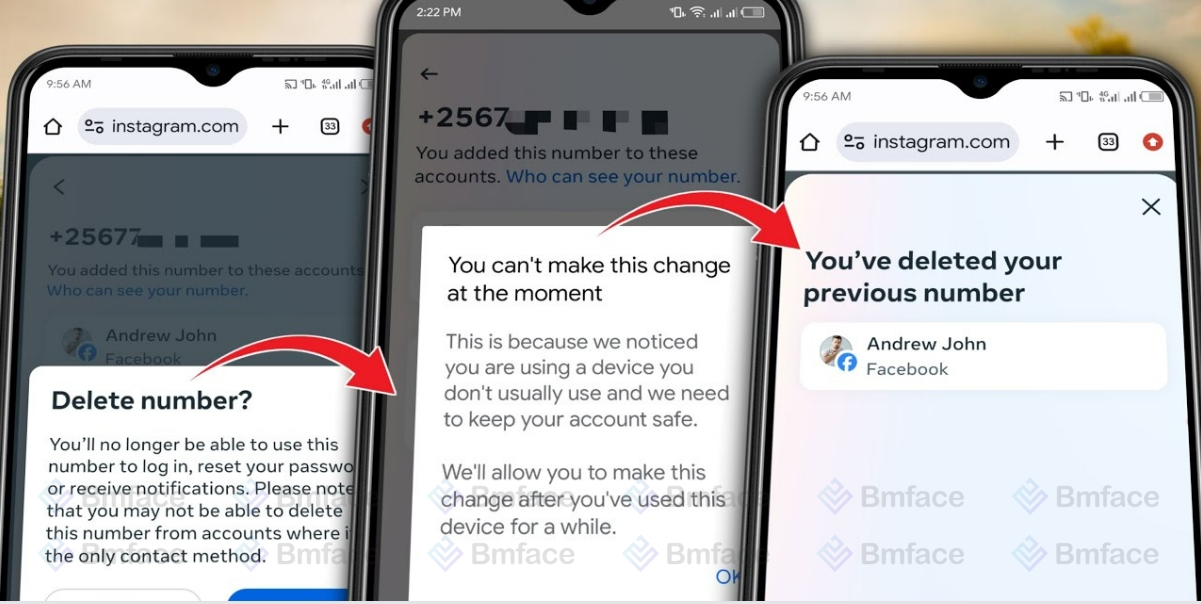
Troubleshooting: When You Can't Remove Your Phone Number
Encountering issues when trying to remove your phone number from Facebook can be frustrating, especially if it's tied to essential account functionalities like login or security verification. Here's how to troubleshoot common problems:
1, The Only Method of Login
-
Issue: Facebook requires at least one piece of contact information for account recovery and login verification. If your phone number is the sole method of login, you might encounter difficulties trying to remove it.
-
Solution: Before attempting to remove your phone number, add an alternative contact method. Go to your account settings, find the section for contact information, and add a new email address or another phone number. Verify the new contact method through the confirmation process provided by Facebook. Once added and verified, you should be able to remove your original phone number without issues.
2, Two-Factor Authentication Concerns
-
Issue: Two-factor authentication (2FA) enhances the security of your account by requiring a second form of verification upon login. If your 2FA is linked directly to your phone number for receiving codes via SMS, removing the number could compromise your account's security setup.
-
Solution: Switch to an app-based 2FA method, which doesn't rely on your phone number. Both Google Authenticator and Facebook's Code Generator are secure alternatives that generate login codes without needing a network connection. To switch, go to your security settings, navigate to the 2FA section, and select the option to set up a third-party app for code generation. Once you've transitioned to an app-based 2FA method, you can safely remove your phone number from your account.
Conclusion
While removing your phone number from Facebook should be straightforward, specific account settings like your primary login method or 2FA setup can complicate the process. Ensuring that you have an alternative contact method and switching to an app-based 2FA solution can help circumvent these issues, allowing you to update your contact information while keeping your account accessible and secure. It's crucial to navigate these changes thoughtfully, ensuring continuous access to your account and maintaining its security. By adopting these solutions, you can effectively manage your contact information on Facebook and maintain the integrity of your account's security measures.
Don't forget to follow Bmface and tutorial blog to update more interesting content!
Cảm ơn bạn đã theo dõi bài viết. Mua hàng tại Bmface.com để ủng hộ đội ngũ Admin viết thêm nhiều bài viết hay. Xin cảm ơn!